At this point in the setup process there is a handful of manual steps to be taken. (With some further investigation these -could be- should be accomplished via some wiring up in the dotnet template creation process, but that is another article.)
Docker Related Updates
The first update that needs to be performed is ensuring the docker container running the rendering host (the public site) is properly watching the Next.js directory.
- Open the docker-compose file found at docker/docker-compose.yml
- Locate the definition for rendering, this is about line 30.
- Update the volume mapping (line 33) from ..\src\rendering to be ..\src\rendering\rainflytours.

- At the prompt stop and restart the Rendering container so reload the volume mount setting.
docker container restart docker_rendering_1
Setup to Support Sitecore
The next series of updates will be made to the Next.js application to ensure it can communicate with Sitecore for content rendering as well as editing. Because the communication is done through APIs, there a few different client keys/tokens that must be setup on both sides. Some of these have already been created as part of the init.ps1 process, others must be manually done.
Creating the Sitecore Services Client API Key
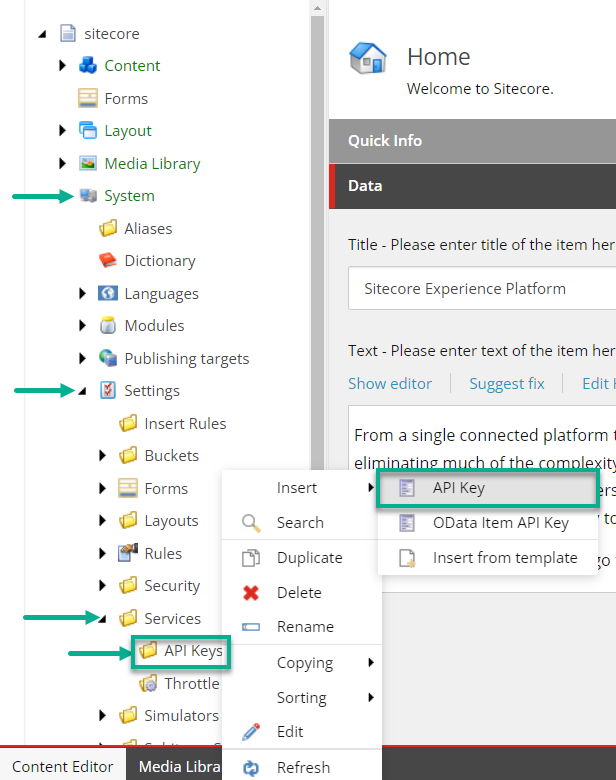
The most critical key is the Sitecore.Services.Client API Key, documented at https://doc.sitecore.com/xp/en/developers/hd/190/sitecore-headless-development/create-a-sitecore-api-key.html. The steps are as follows
- Log into Sitecore CM, https://cm.rainflytours.com/sitecore
- From the dashboard launch the Content Editor
- Expand the tree to ‘/sitecore/system/Settings/Services/API Keys’
- Create a new ‘API Key ‘ item, name it in a manner that you understand its use, such as RainflyToursJSS.
- Set CORS Origins (development server host can make HTTP requests to Headless Services) to asterisk ( * )
- Set Allowed Controllers to either an asterisk to allow all controllers to work or set a specific list of controllers in a semi-colon separated list. This is the recommended practice and would look like so.
  Sitecore.LayoutService.Mvc.Controllers.LayoutServiceController;
  Sitecore.JavaScriptServices.Globalization.Controllers.DictionaryServiceController;
  Sitecore.Services.GraphQL.Hosting.Mvc.GraphQLController;
  GraphQL:/api/rainflytours
- Optionally set Impersonation User, always specify an explicit user. The impersonation user is a Sitecore user whose security context is used to determine the security rights of the JSS app to Sitecore content
- Save and publish the item
- The actual key that will be used for authenticating API calls is the item id, copy the item id.
- A quick test can be performed to ensure the key is functioning. Open a new browser tab and navigate to https://cm.rainflytours.com/sitecore/api/layout/render?item=/&sc_apikey=ITEM_ID, where ‘ITEM_ID’ is the id, you just copied.
This test will return the JSON for the default home node, and should look something like

Setting Up the Patch Configuration Files
The next series of updates will be made to the Next.js application to ensure it can communicate with Sitecore for content rendering as well as editing.
Part of the application template created with jss create is a Sitecore patch config with a number of settings and is very well commented explaining when and why certain settings should be turned on or off. The file is found in rainflytours/sitecore/config/rainflytours.config.

To make our learning experience the most successful, the following minimum changes should be made. Be sure to review all the settings and their associated comments to ensure there is not functionality your specific site may need.
- Uncomment Analytics.ForwardedRequestHttpHeader (line 22) to allow proper IP handling for the container environment
- As with a traditional-MVC build, Sitecore must be made aware of a ‘site’ within the content tree. (If you an environment is SXA-based the following steps should be done from the SXA Site Manager tool, and this section should be commented out in the patch-config.) The updates to the sites node (line 67) is:
- hostName – line 69, set to be the ‘public’ URL for CM, cm.rainflytours.com
<site patch:before="site[@name='website']"
    inherits="website"
    name="rainflytours"
    hostName="rainflytours.com"
    rootPath="/sitecore/content/rainflytours"
    startItem="/home"
    database="master" />
- In addition to being recognized as a site within Sitecore for editing and data retrieval plumbing, we must register our headless site as an app (line 90) to allow successful communication with the layout services.
- name – this is the app name, should match the same value used in the site-node as ‘name’
- sitecorePath – path in the content tree to the app/site, again should match what was set in the site-node for ‘rootPath’
- serverSideRenderingEngineEndpointUrl – server to server communication for rendering,
- In a docker container setup, such as this, use the container name for the rendering host as
http://rendering:3000/api/editing/render
- In a docker container setup, such as this, use the container name for the rendering host as
- serverSideRenderingEngineApplicationUrl – public URL for the site, this can be configured to leverage the docker-compose environment variables by setting as:
$(env:RENDERING_HOST_PUBLIC_URI) - Add an attribute for deploymentSecret – set this to the docker-compose environment variable value of
$(env:JSS_SC_DEPLOYMENT_SECRET) - The following attributes can be left as set by default
- layoutServiceConfiguration
- useLanguageSpecificLayout
- graphQLEndpoint
- inherits
- serverSideRenderingEngine
<app name="rainflytours"
    sitecorePath="/sitecore/content/rainflytours"
    serverSideRenderingEngineEndpointUrl="http://localhost:3000/api/editing/render"
    serverSideRenderingEngineApplicationUrl="$(env:RENDERING_HOST_PUBLIC_URI)"
    deploymentSecret="$(env:JSS_DEPLOYMENT_SECRET)"
    layoutServiceConfiguration="default"
    useLanguageSpecificLayout="true"
    graphQLEndpoint="/sitecore/api/graph/edge"
    inherits="defaults"
    serverSideRenderingEngine="http"
/>
The following configuration values do not need be modified for the setup as provided by the TheCodeAttic.Sitecore.DockerTemplates, but you should be aware of when configuring other environments.
- JavaScriptServices.ViewEngine.Http.JssEditingSecret secures the communication for page editing between the server (Sitecore CM) and the rendering server where the application exists. The value set here must match the JSS_EDITING_SECRET found in the Next.js .env file. (not required)
- ExperienceEdge.EnableItemLanguageFallback and ExperienceEdge.EnableItemLanguageFallback handle the support for multi-language within a site.
Deploying the Patch Config
The final thing that needs to occur is to get the patch config just edited into Sitecore. This can be done manually by copying the file from ../src/renderings/rainflytours/sitecore to ../docker/deploy/platform where the Sitecore CM container watches for code to copy, while creating the App_Config directory structure.
Or you can take advantage of the JSS CLI command jss deploy config. (As I’m always a fan of a script to help avoid mistakes this is the direction to explore now.)
- Re-open if you have closed your PowerShell prompt as Admin.
- Change directory to the JSS application, “`C:\Project\RainflyTours\src\rendering\rainflytours“
- Run the command
jss deploy config, you will then get prompted by a series of questions - The first question will ask you to establish the connection to Sitecore, enter y
- Next, the question is about where you Sitecore instance exists. As we are using containers to run the environment, it behaves more like a network share setup, so enter y.
- The path should be fully qualified and point to the where the CM container is watching for code deployments, this would be “`C:\Project\RainflyTours\docker\deploy\platform“
- Hostname is the URL for the CM server when accessing from outside the docker network, thus enter https://cm.rainflytours.com
- You will be shown a sample URL for the JSS import services, this is only needed if we were building the site in disconnected or Sitecore-less, we can accept the default by hitting Enter.
- Next, we are asked for the API Key that was created within Sitecore.
- Finally, to ensure good security the deployment secret needs entered. This is a key that is generated as part of the docker setup via init.ps1. Sadly the CLI is smart enough to not allow a short value, such as a environment variable reference. You can either copy the value from ../docker/.env file or accept blank to let the system create a new one, and then replace it with the env variable.
- The CLI will ask you double check the files in the sitecore directory. Then hit Y to copy the config files into the docker deploy directory.

## Next.js Environment Variables
For the Next.js headless site to function it needs to be aware of how to communicate with the Layout Services of Sitecore. This is done through environment variables defined in a .env and .env.local files. (For a deeper look at how Next.js handles configuration values see the article [Handling Configuration Settings](https://thecodeattic.wordpress.com/2022/03/08/handling-configuration-settings/).)
By default the *.env* is committed into source, and thus can be configured once with a few key values that don’t change as they apply to the container based Sitecore environment.
1. Open the file ../src/renderings/rainflytours/**.env**
2. First value to set is **PUBLIC_URL**, this will be used to generate links and should be the URL users would access the site/applications, enter **https://rainflytours.com**
3. Next locate **SITECORE_API_HOST**, this value is how the rendering-host container will communicate to Sitecore, thus enter the docker network based URL of **http://cm**
4. Similar in manner the **GRAPH_QL_ENDPOINT** would need to be tied to the docker network URL, enter **http://cm/sitecore/api/graph/edge**
With the base values set and committable to source code, you will need to setup a local environment file, with specific values for you.
1. Create a new file named **.env.local** at the root of the application code (this would be a sibling to .env.)
2. Add the following name-value pairs:
* SITECORE_API_KEY
* JSS_EDITING_SECRET
To allow these configuration files to take effect the Next.js application needs to reload, the easiest method is to restart the rendering container via the command: “`docker container restart docker_rendering_1“`.
Once the container has restarted, in a browser go to [https://rainflytours.com](https://rainflytours.com), and if things are configured correctly you should be welcomed by a most excellent error message such as

Which indicates that our headless site can successfully request content from Sitecore, just that there is no content to get, which leads us into the next article, creating the site’s content tree.
References
- https://doc.sitecore.com/xp/en/developers/hd/190/sitecore-headless-development/walkthrough–creating-a-jss-next-js-application-with-the-jss-cli.html
- https://doc.sitecore.com/xp/en/developers/hd/190/sitecore-headless-development/sitecore-javascript-rendering-sdks–jss-.html
- https://doc.sitecore.com/xp/en/developers/hd/190/sitecore-headless-development/sitecore-javascript-rendering-sdk-cli-tools-api-reference.html
